|
 |
|
Home Members
|
EROS.......an all time classic. Click for Part Two - - - - - Click for Part Three How can anyone resist this classic shape? Smooth sheet fuselage, big span, long moment arm, high tail. But how long will it take me to build it? I have so many other ambitions. Well, this method won't suit everyone, but I shall set a timetable.
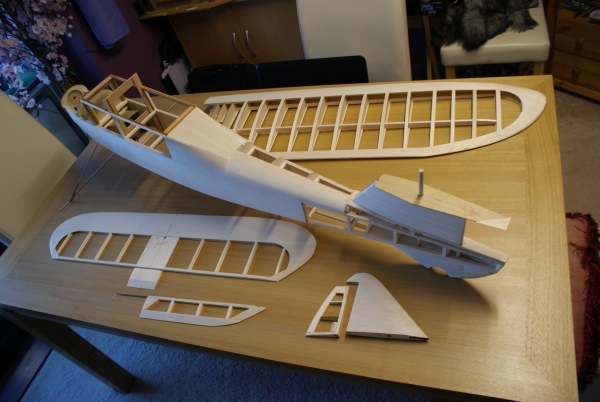
Hmmmm! well, let's try. Here are photos at the end of month one, so I am on task so far.
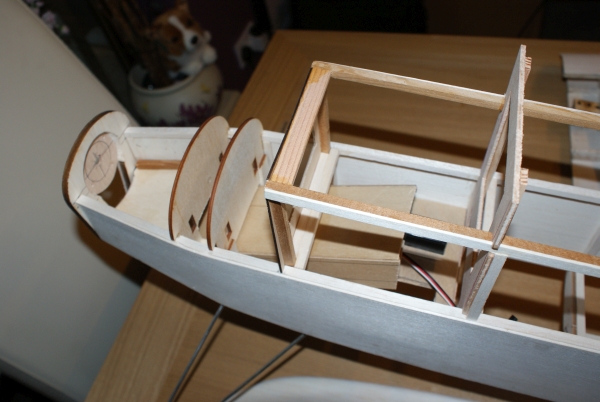
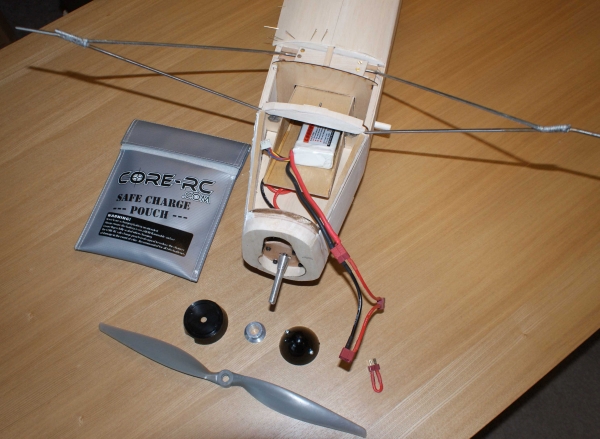
Wing was a pleasure to put together: capstrips above and below, two part trailing edge as per the sainted Junior 60. The plan shows wings banded onto the fuselage, but I wish to avoid rubber mounting and instead use wire joiners , of which I had a lot of experience with A2 contest gliders. Consequently, I have purchased a set of joiner clips from DB Sport and Scale, so the wings can't come loose. I was surprised how lightly built the fuselage is, if one adheres to the plan. No upper or lower longerons to support the curved sheeting. Well, there are now! Having been brought up on Meccano, I have an understanding of two - and three- dimensional structures (culminating I the "birdcage" Ferrari sportscar of the sixties) but not of monocoques. I stand to be corrected by the many (too many) ex-engineers among us, but I think this fuselage could be described as a semi-monocoque when fully skinned. Perhaps they used tougher balsa when this was designed. Mounting the wing firmly to the fuselage required an additional former midway down the cabin & some spruce, but the job remains remarkably light. A 'phone call to Balsa Cabin promptly provided twenty lovely sheets of 1/16th balsa, much of which will get used up here. This will be powered by my usual three-cell electric power train, so a battery box forms part of the nose structure. The tail is flat plate, but well designed, like that of the Black Magic, so is very unlikely to warp. Now, how am I going to get any control to those high elevators?
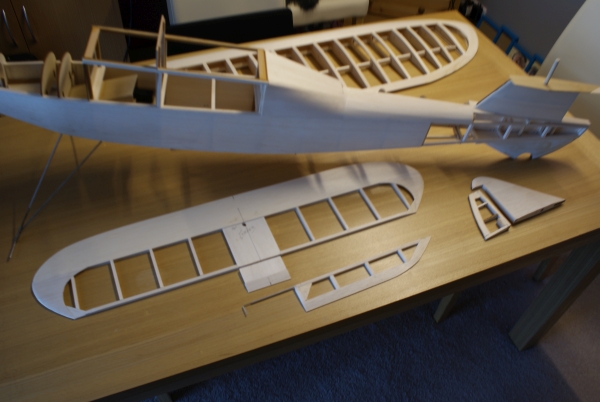
Oh, why don't I plan things properly before I start building? So, there it is part one completed, at the end of November. Next entry, end of December. Or, if you hear nothing, it's all gone pear-shaped. Look in sometime, to find out! Of course, if I WERE an engineer, ex or otherwise, I would have thought through the potential problems before starting out, rather than going at the basic construction pell mell and expecting everything to turn out right at the end, which only happens in Theatrical Performances. The issue of drive to the elevators was easily solved by mounting a mini servo in the lower part of the fin; quite a good idea for larger models, which I shall probably use again. More serious was the realisation that permanently mounting the wing centre to the fuselage would require a degree of reinforcement of the cabin area that would risk changing the character of the design. So, rubber bands it would be. It's a long time since I've touched down a tip on landing, but a ground loop could cause it to happen, and the twisting motion may rip apart a lightly built cabin. Somehow, this months' tasks just seemed to take much longer that expected. Photographs will show little change, but the fitting of all systems, hatches, motor and sheet covering just dragged on. This is what we Rugger Types call the “hard yards.” Lots of work for little obvious result, yet the final outcome relies upon effort and accuracy at this stage. However, it is the last day of the second month, and I am still on target.
Most of the sheeting done, and servo neatly installed in fin. The hole in rear decking is when it fell off the cradle that I was using to protect it from damage. Heigh Ho!
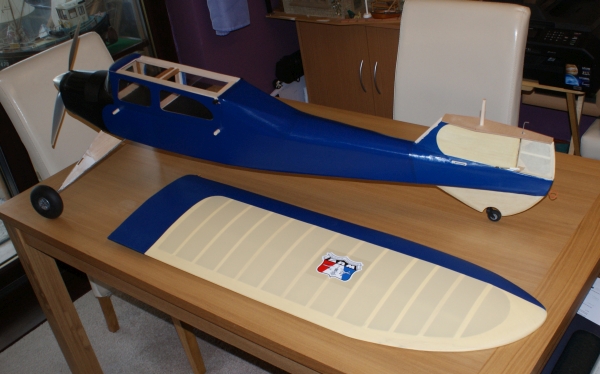
One thing that I have planned for is the full installation of an Arming Lead (4max, £3.99) inside the bodywork rather than having untidy wires dangling under the fuselage. (I now use these for all 3 Cell systems.) The plug will not be firmly built into the model, but will attach to floating wires, as the leverage needed to remove & refit the Deans (ribbed ) connectors is quite large. Next month will be just covering...all down hill to the end. Ha! The finishing off seems to be taking a disproportionately long time. After covering the wing, which took one day and was the most satisfying single day of the whole build, I felt that I needed a break. It is instructive to note that the basic building of all the structures took only ten days, but that it seems that another ten weeks would be needed before completion. Resisting the temptation to begin some other model for variety, I spent a week buried in a racy nineteenth century novel. Wow! those French! That ended just in time to attend the PMFC “Unfinished Objects” evening, which provided sufficient incentive to plough onward. I had decided upon a solid colouring for the fuselage, and had a little Dark Blue Solartex which was added under the fin. Now, determined to get the right colour (they do several blues) I sent a sample to my regular supplier (Blackburn Models: very helpful) so as to avoid any confusion. Two meters promptly arrived, and I covered the rest of the fuselage with as few joint lines as possible. Hey, that looks good. Let's see it in natural light. Oh! The shades are subtly different! Too late now. I wonder if Solartex can be like wallpapers: you must work from the same batch. (Does anbody know?) It's one of those errors that nobody will see unless they know where to look. (And, anyway, much worse is to come.) As we know, there are certain substances that are of infinite benefit to mankind. Penecillin, WD 40 and chocolate covered Kendall Mint Cake for instance, (and the inventor of the “off” switch has never been satisfactorily rewarded.) Now we must add to that list, “Poly C.” I use it for laminating, for glass fibre work, and as a final, gloss surface. (Remember my C/L jobs, tissue over Polyester with a Poly C finish?) It doesn't smell, spreads evenly and brushes wash in water. Every home should have some. I gave the fuselage a couple of coats, with more to come later. (It's touch dry in half an hour.)
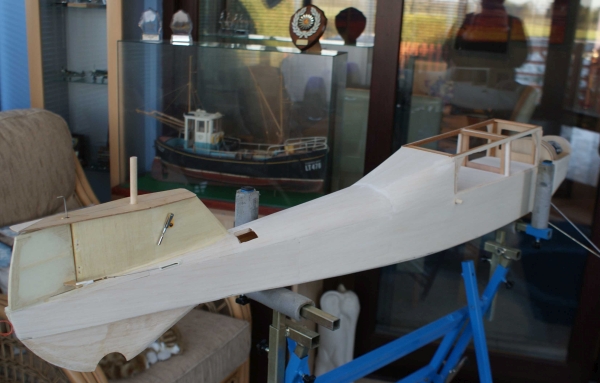
Then, at last, the great day: the first full assembly of all the components. Big, isn't it? BUT: Why, oh why can't I build anything without committing as least one major blunder! So Stupid! No excuses! The lower part of the fin leans a couple of degrees to starboard. How could I have done that? I could fix the tail tilt and it would fly OK, but it would still look wrong. What to do? (I remembered a club colleague who had recently stamped on a Black Magic fuselage and built another because it was marginally out of line.) If only I had been an engineer and double checked everything at each stage. After a disturbed night's sleep, with images of stripping down the entire (covered and finished) rear fuselage, I woke to find that a gentle operation with a Swann Morton No blade, and the subcutaneous addition of balsa shims and spacers beneath the port sheeting, added to a new tailplane mount and fin leading edge, would just about fix it. Phew! Lessons have been learned. At no time had I establish a lateral datum for measuring and checking. In a smallish room manufacturing components is easy, lining them up difficult. Finally, with the model in my “Great Mate” in the lounge, spirit level on the wing mounting and using the frame of the window as a sightline, all came right. So, here I am at the end of the three months, and, although the model could be taken out and flown, it is not quite complete yet. Hatches and catches (boring!) need to be finished, and the fairing between front and rear u/c legs is being done, although once again I am testing my method on the Black Magic. I have laminated two layers of bookshelf quality 1/16th (with Poly C), fitted them between the wires, fibreglassed over them using Poly C as a resin, covered them with Solartex, with a final gloss covering of...youknow what. Looks nice. Interestingly, John Coasby's 1948 Aeromodeller article suggests fairing the legs with a “rubber sleeve” which we assume (and hope) would have been inner tube. Visually, the model is all wrong, the perfect combination of imperfections. The u/c is a little too long, the wing a little too wide, the moment arm too great and the tailplane just enormous. To complete this misquotation from the Ealing Comedy, this combination of faults results in a truly beautiful aircraft. It's now the last day of January, and other projects beckon. The model is not likely to quit the surly bonds until a calm day in March (if there is one) so I can top off the remaining jobs at leisure. I have tried to do it justice, and as soon as I can assemble it outdoors, I'll add a photo or two to complete this article. John Ashmole |