 |
 |
|
Home Technical
|
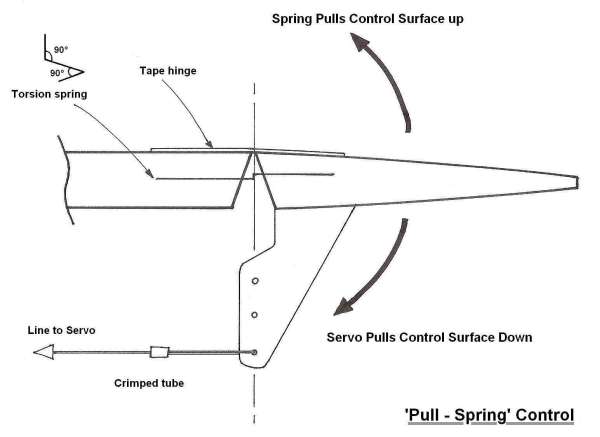
'Pull - Spring' Control for RC and Radio Assist I've pinched this method from IM but thought it was worth sharing. It's not a new idea - in fact it's now the standard method of setting up rudder and elevator control in DLG - however it really is a simple and light method of linking servos to control surfaces and may be handy for small radio models and those converting Free Flight models to Radio Assist.
The idea is similar to a closed loop 'pull-pull' system but a spring provides movement one way and a single line to the servo opposes the spring. The spring is usually a tiny torsion bar bent from a steel guitar string and is secreted within the hinge gap at the tail. The pull line is connected to a conventional control horn.
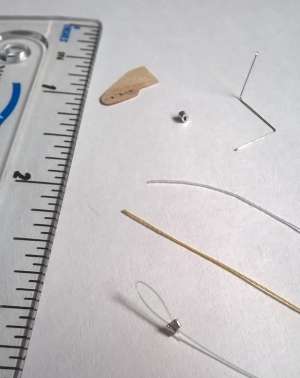
The spring can be bent from a guitar top E steel string (0.010" thick). The torque provided by the spring depends on the angles you bend to start with and the length of the central bar, on my 30" DLG it's bent to 90 degrees and is 15mm between centres. You could go as long as 40mm. I would suggest playing around with the dimensions to find something that suits you. The spring is installed so that the control surface is pushed to full throw on the side opposite the control horn. Each arm is pushed into the balsa and secured with a dab of thin CA. The bar lies along the hinge gap. The spring needs to be stronger than the aerodynamic loads of the control surface in flight but not too strong for the servo.
The servo line can be anything with low stretch. On DLGs I use kevlar thread but nylon fishing line or braid, Spider Wire, Nylbond (nylon bonded thread) are all good alternatives. Anything that you would use as a D/T line should work. The line can be secured by crimping a small section of 1/16" diameter aluminium tubing or simply a knot. I like the tube crimp method because it can be removed (carefully) with a craft knife without damaging the line. Once the hinge is installed, the flying surface and servo are centred and the line is attached. Tweaking and trimming is then best done on the transmitter.
The chief advantages of this method are:
A slight disadvantage is that the servo is under constant light load from the spring, but this is not an issue providing the spring's strength is matched to the servo. One elegant solution to stop the servo grumbles is to make another spring at the servo end to equalize the load. An example is in this thread, at the bottom of the page. The method can provide a simple, precise, slop-free linkage at low weight and would make a unobtrusive set up in a small FF to RC conversion, or possibly even a small RC trim tab on a larger FF model. Jonathan Whitmore |
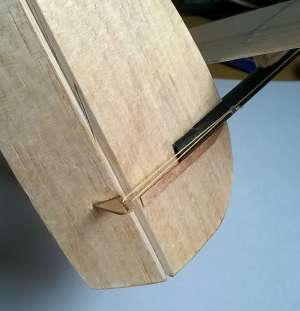 Set up as seen on a 30" DLG, the spring bar
is just visible in the hinge gap.
Set up as seen on a 30" DLG, the spring bar
is just visible in the hinge gap.